
For the pasta dough:
🥚 5 whole eggs (room temperature)
🌾 500 g (4 cups) all-purpose flour “00”
🧂 A pinch of salt
For the filling (traditional Bolognese recipe):
🍖 150 g pork loin (or pork tenderloin)
🐖 150 g Parma ham (aged prosciutto crudo)
🍖 150 g Mortadella di Bologna IGP
🧀 150 g Parmigiano Reggiano (aged 30 months), grated
🥚 1 egg
🌰 Freshly grated nutmeg, to taste
🌶 Black pepper, to taste
🫒 A drizzle of extra virgin olive oil for browning the pork
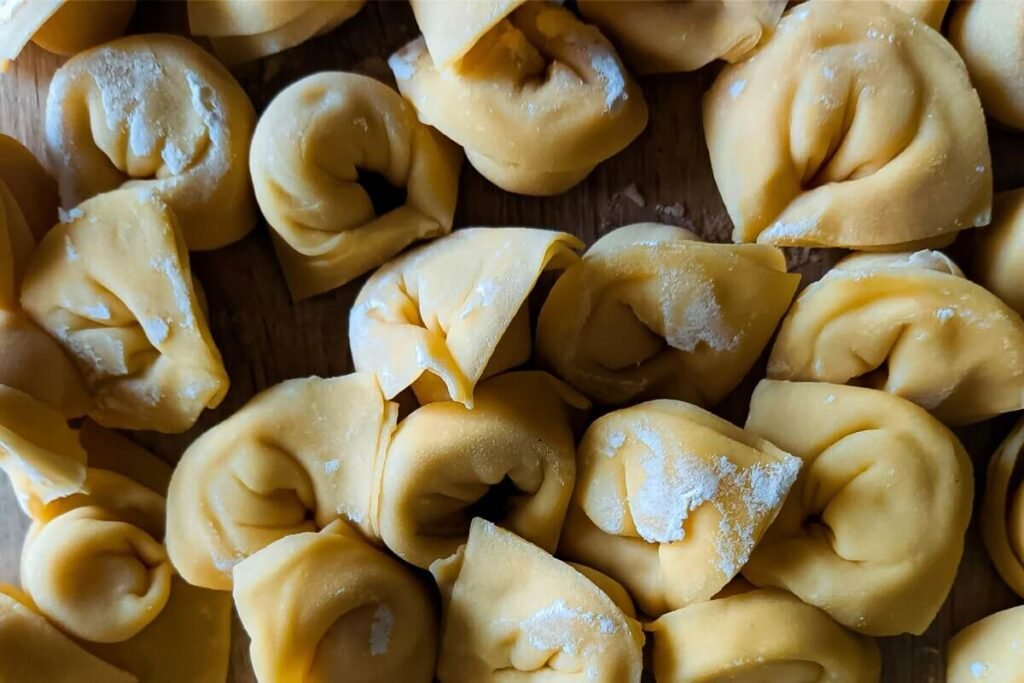
Making italian tortellini at home is not just a recipe but an ancient ritual passed down through generations in Emilia-Romagna. These tiny pasta parcels, folded into their iconic “navel” shape, are filled with a delicate mixture of pork, prosciutto, mortadella, Parmigiano Reggiano, and spices. Unlike ravioli or tortelli, tortellini are smaller and require precise craftsmanship, making them the pride of Bologna and Modena. This guide will walk you through the complete process: from preparing the dough to shaping the tortellini, ensuring authentic results.
Wooden pastry board (spianatoia): The ideal surface to knead and roll pasta; the wood holds the flour and helps with texture.
Digital kitchen scale: Precision is essential when balancing flour, eggs, and filling.
Sharp knife & pastry cutter wheel: For cutting clean pasta squares.
Rolling pin (or pasta machine): To roll dough sheets thin enough (0.6–0.8 mm). With a machine, roll from thick to thin settings step by step.
Meat grinder or food processor: To mince the filling to the right consistency. Grinder gives a rustic texture; food processor makes it smoother.
Small spoon or tortellini spoon: To portion the filling uniformly.
Tray dusted with semolina: To store tortellini before cooking without sticking.
Clean kitchen towels: To cover resting dough and shaped pasta.
1️⃣ Prepare the pork
Begin with the pork loin, the heart of the filling. Pat it dry with kitchen paper so it browns properly. Cut the meat into small, even cubes—this helps it cook quickly and grind smoothly later. Heat a skillet with just a drizzle of extra virgin olive oil. Add the pork and sear it over medium-high heat for a few minutes, just until the edges take on a golden crust. This step is not about cooking the meat through but about unlocking flavor through caramelization (the Maillard reaction). Remove from the heat and let the pork cool completely. Warm meat would ruin the texture of the filling when ground, so patience here is essential.
2️⃣ Make the filling
Once the pork is cooled, it’s time to bring the filling together. Pass the pork cubes through a meat grinder fitted with a fine plate, followed by the prosciutto and then the mortadella. If you don’t own a grinder, a food processor will work—just pulse in short bursts so the mixture doesn’t overheat. Transfer the finely ground meats into a large bowl. Add the Parmigiano Reggiano, a fresh egg, a gentle dusting of nutmeg, and a twist of black pepper. Mix everything thoroughly with a spoon or your hands until the filling becomes creamy but still compact. Adjust the seasoning carefully: prosciutto and Parmigiano are naturally salty, so extra salt may not be needed. Cover the bowl and keep the filling in the refrigerator while you prepare the dough. The chill keeps it firm and easier to work with later.
3️⃣ Make the dough
On a wooden pastry board, mound the flour into a volcano-shaped “well.” Crack the eggs into the center and add a small pinch of salt. With a fork, gently whisk the eggs, gradually pulling in flour from the walls of the well. As the mixture thickens, begin kneading with your hands. Use the heel of your palm to push the dough away, fold it back over itself, and rotate. Continue kneading for about 10–12 minutes until the dough feels smooth, elastic, and supple, not sticky. Wrap the dough tightly in plastic wrap or cover with a clean kitchen towel, and let it rest for at least 30 minutes at room temperature. This pause relaxes the gluten, making the dough easier to roll thin without tearing.
4️⃣ Roll out the dough
After resting, divide the dough into manageable portions. Take one piece and flatten it slightly. If using a rolling pin, roll from the center outward in all directions, turning the dough often to maintain an even thickness. If using a pasta machine, start with the widest setting, passing the dough through several times to strengthen its structure. Gradually reduce the thickness setting until the sheet is very thin—around 0.6 to 0.8 mm. For tortellini, the dough must be thin enough to fold multiple times without cracking, yet strong enough to hold the filling. Dust lightly with semolina flour to prevent sticking.
5️⃣ Cut the squares
Lay the sheet of pasta flat and, with a sharp knife or pastry wheel, cut it into small squares about 3–4 cm across. Size matters: too large and you risk making tortelli; too small and the filling won’t fit. Cover the squares with a clean towel as you work, so they don’t dry out.
6️⃣ Fill and shape the tortellini
Take one pasta square and place a tiny pea-sized portion of filling right at its center. Less is more—overfilling makes sealing impossible. Fold the square diagonally into a triangle, pressing firmly along the edges to eliminate any air pockets. Air is the enemy here; it can cause the tortellini to burst during cooking. Now comes the signature shape: take the two longest corners of the triangle, wrap them around your index finger, and press them together firmly to form a tiny “navel.” Place each tortellino on a tray dusted with semolina, fold side down. Continue until all the dough and filling are used.
7️⃣ Cooking (test & timing)
Bring a large pot of salted water to a gentle boil. Drop in the tortellini, stirring softly to prevent sticking. Fresh tortellini need just 3–4 minutes to cook. You’ll know they’re ready when they rise gracefully to the surface. Taste one: the pasta should be tender but still slightly firm (al dente), while the filling should be fragrant and cohesive. If cooking from frozen, add an extra 1–2 minutes. Drain immediately and serve with your preferred sauce or broth.
Always keep filling cold while shaping, so it holds its texture.
If edges don’t seal, lightly moisten with water.
Work in assembly-line fashion: one person fills, one folds, one seals.
To freeze, arrange tortellini on a tray in one layer, freeze solid, then transfer to bags. Cook directly from
Storage
Fresh: Up to 24 hours in the fridge, covered with plastic wrap.
Frozen: Up to 2 months (better frozen first on a tray, then bagged).
Cooked: Best eaten immediately for ideal consistency
The origins of tortellini are legendary. According to myth, an innkeeper in Castelfranco Emilia, inspired by the beauty of Venus’s navel, shaped the pasta to resemble it. The first written mention dates back to the Middle Ages, and in 1904 the official filling recipe was deposited by the Italian Academy of Cuisine: pork loin, prosciutto, mortadella, Parmigiano Reggiano, egg, and nutmeg. Since then, tortellini have become a symbol of Bologna’s culinary tradition, representing conviviality and craftsmanship.

Tortellini Foto di Aknazar Arysbek su Unsplash
Tortellini Footer Immagine di KamranAydinov su Freepik
Share this recipe
Lorem ipsum dolor sit amet, consectetur adipiscing elit. Ut elit tellus, luctus nec ullamcorper mattis, pulvinar dapibus leo.