
1️⃣ 1.5 kg beef chuck or shoulder (cappello del prete cut if available)
2️⃣ 1 bottle Barolo DOCG (750 ml)
3️⃣ 2 large carrots
4️⃣ 2 celery stalks
5️⃣ 2 golden onions
6️⃣ 3 garlic cloves
7️⃣ 1 sprig fresh rosemary
8️⃣ 2 bay leaves
9️⃣ 5 juniper berries
🔟 4 whole cloves
1️⃣1️⃣ Extra virgin olive oil (4 tablespoons)
1️⃣2️⃣ Butter (50 g)
1️⃣3️⃣ Salt and black pepper to taste
1️⃣4️⃣ Flour (1 level tablespoon, to thicken the sauce)
Beef braised in Barolo wine is not just a dish; it is a true gastronomic journey into the heart of Piedmont and the Langhe region. This majestic recipe requires patience, precision, and the finest ingredients. The star is Barolo DOCG, the “king of wines,” which with its tannins and bold aromas penetrates the meat and transforms it into tender, flavorful perfection. Cooking Brasato al Barolo means embracing slow cooking, refined techniques, and modern professional tools like stand mixers, blenders, chinois, and cast iron casseroles. It is a dish for gourmets who want to test their skills and enjoy a timeless Italian masterpiece.
Stand mixer with flat beater to emulsify the marinade of wine and spices evenly
Immersion blender to obtain a smooth and velvety sauce from the cooking juices
Chinois fine mesh strainer to filter liquids and ensure a refined sauce without impurities
Enamelled cast iron casserole which maintains constant heat and guarantees even braising
Chef’s knife and sturdy cutting board for precise vegetable preparation and trimming
Large ceramic or glass bowl for marinating the beef overnight
Whisk to bind butter and flour when thickening the sauce
Long wooden spoon to stir gently during braising without breaking down the meat
🔹 Step 1 Marinade
1️⃣ Choose the right piece of meat and prepare it
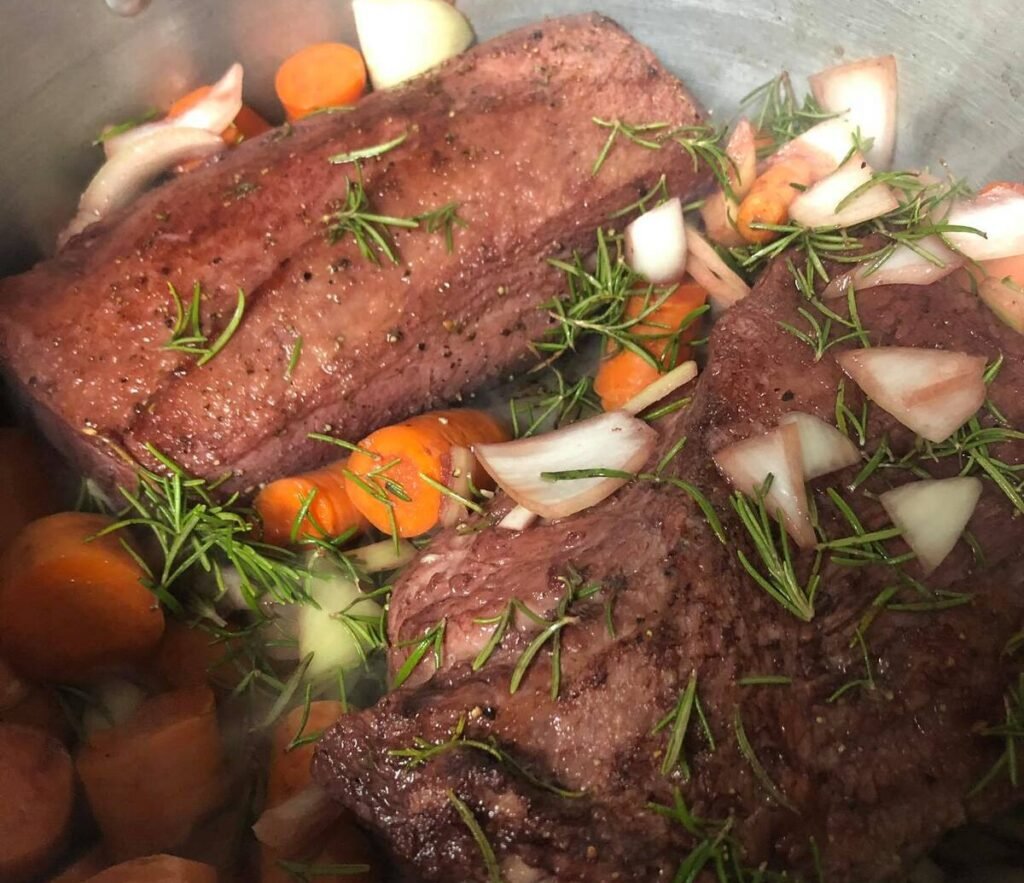
• Select a well structured cut such as beef chuck or the cappello del prete. Trim obvious excess fat and any loose silver skin with a sharp chef’s knife, but keep a modest layer of fat because it adds flavour during slow cooking. If the piece is very irregular, tie it with butcher’s twine at two to three centimetre intervals so it keeps a compact shape and cooks evenly.
2️⃣ Prepare the vegetables and aromatics
• Cut the carrots, celery and onions into large chunks roughly two to three centimetres across. You want pieces large enough to be strained out later but small enough to release their flavour into the liquid. Smash the garlic cloves lightly with the flat of the knife to bruise them; this releases aroma without pulverizing. Keep the herb sprigs whole so they are easy to remove.
3️⃣ Combine wine and aromatics in a non reactive container
• Use a glass, ceramic or stainless steel bowl or a zip top bag. Avoid aluminium. Pour the entire bottle of Barolo over the meat and vegetables so the liquid completely covers the ingredients. Add the bay leaves, rosemary sprig, juniper berries and whole cloves. If you use a vacuum sealer and vacuum bag, remove the air and seal; the vacuum helps the wine penetrate faster. If you use a zip top bag, press out as much air as possible and lay flat in the refrigerator.
4️⃣ Timing and temperature of the marinade
• Refrigerate at four degrees Celsius or below for twelve hours. Twelve hours lets the tannins from the wine and the aromatic compounds gently penetrate surface fibres and start softening connective tissue without denaturing the protein to mush. Do not exceed twenty four hours because prolonged acid contact can make the outer meat texture mushy. Turn the meat once after six hours to expose all sides to the wine evenly.
5️⃣ Optional pro equipment and shortcuts
• Vacuum sealing cuts marinade time. A vacuum sealed bag can achieve good penetration in two to four hours.
• If you have an immersion circulator and want more precise control, you may use sous vide after an initial short marinade. See step three notes for that alternative.
6️⃣ Hygiene and safety notes
• Always keep the marinating meat refrigerated. Never marinate at room temperature. Use separate containers and utensils to avoid cross contamination. Discard marinade that has been in contact with raw meat unless you boil and reduce it for use in sauce.
🔹 Step 2 Browning the Meat
1️⃣ Remove, drain and pat dry
• Remove the meat from the marinade. Reserve the marinade by straining it through a fine sieve to remove solids and keep it for later. Pat the meat thoroughly dry with paper towels. A dry surface is essential to achieve a deep brown crust. If you tied the roast, make sure the twine is secure now.
2️⃣ Season and oil lightly
• Season lightly with salt and freshly ground black pepper just before searing. Use a neutral oil with a high smoke point or a mix of olive oil and a small knob of butter for flavour.
3️⃣ Heat management and pan selection
• Use a wide heavy bottom pan or, preferably, an enamelled cast iron casserole to get even heat. Preheat the pan until it is very hot, then reduce to medium high so the oil shimmers but does not smoke violently. You want the Maillard reaction to occur, generating a deep brown crust and those fond bits that will flavour the sauce.
4️⃣ Searing technique and timing
• Place the meat carefully and let it sear without moving for three to five minutes per face until a deep mahogany crust forms. Use tongs to roll and sear every exposed surface, including the ends. If the piece is large, sear in two stages so you do not overcrowd the pan. Transfer the meat to a plate once all sides are deeply browned.
5️⃣ What to do with the fond
• After searing, do not discard the browned bits in the pan. Deglaze the pan with a small splash of reserved strained marinade or a little wine, scraping the bottom with a wooden spoon to lift the fond. This liquid is highly flavourful and will be added back into the braise. If the pan becomes too dark, remove some excess burnt oil and reserve.
🔹 Step 3 Slow Braising
1️⃣ Prepare the cooking vessel and liquid level
• Return the seared meat to the casserole and add the large vegetable pieces from the marinade. Pour in about half to two thirds of the reserved strained marinade so the liquid reaches about halfway up the meat surface. The goal is moist heat and steam, not full immersion; this keeps texture while allowing connective tissue to break down slowly. If you need more liquid use a good quality beef stock or a little water to top up.
2️⃣ Oven method and temperature guidance
• For the most stable and gentle heat use an oven set to 150 degrees Celsius. Place the covered casserole in the oven and let the meat braise for about three hours. The oven provides even surround heat and reliable results.
3️⃣ Stovetop method and heat control
• If you braise on the stove, keep the pot on the lowest flame so you see only a few gentle bubbles occasionally breaking the surface. Vigorous boiling will toughen the meat and evaporate flavour. Maintain this gentle simmer for the entire cooking period.
4️⃣ Timing, turning and basting
• Turn the meat gently every thirty to forty five minutes to ensure even flavour absorption and to moisten all sides. Use a large spoon to baste the top of the roast with the braising liquid to keep the surface hydrated and to help flavours penetrate.
5️⃣ Skimming and degreasing
• During the first forty five minutes you may see coagulated proteins and foam rising. Skim these off with a ladle for a clearer sauce. If excess fat accumulates at the end, chill the sauce briefly and remove the solidified fat or use a fat separator.
6️⃣ How to know when it is done
• The meat is ready when a fork slides into the centre with minimal resistance and the roast feels tender enough to be pulled apart with a fork. Internal temperature is no longer the primary indicator in long braises; texture and tenderness matter more. If you measure temperature, expect the connective tissue to break down in the ninety two to ninety six degrees Celsius range.
7️⃣ Sous vide alternative
• If you prefer an ultra precise finish and have an immersion circulator, you can vacuum seal the marinated roast and cook at a controlled temperature for a long time. A common approach is seventy degrees Celsius for eighteen to twenty four hours for very tender results. After sous vide cooking, quickly sear the meat in a hot pan for colour and to build fond before finishing the sauce.
🔹 Step 4 Making the Sauce
1️⃣ Remove the meat and concentrate flavours
• When the meat is done, transfer it to a warm platter and tent it loosely with foil to rest. Keep the cooking liquid and vegetables in the pot. At this point the liquid is the backbone of your sauce.
2️⃣ Strain and press the solids
• Pour the braising liquid and vegetables through a chinois or fine sieve into a clean saucepan. Press the solids gently with the back of a spoon to extract additional juices and aroma, then discard the solids. For an extra refined sauce pass the strained liquid through a finer sieve or cheesecloth.
3️⃣ Reduce to intensify taste and texture
• Bring the strained liquid to a simmer over medium heat and reduce it until it thickens slightly and the flavour concentrates. Aim for a glossy sauce that coats the back of a spoon. Keep in mind evaporation concentrates acidity and tannin, so taste as you reduce.
4️⃣ Thickening and finishing choices
• If you need more body, make a small roux by melting twenty five grams of butter and whisking in one level tablespoon of flour, cooking for two to three minutes to remove raw flour taste. Whisk this mixture into the simmering sauce gradually until you reach the desired consistency. Alternatively, use a beurre manié by kneading equal parts soft butter and flour and whisking small pieces into the simmering sauce to thicken.
5️⃣ Emulsify for shine and roundness
• Off the heat, swirl in a knob of cold butter or two tablespoons of high quality extra virgin olive oil to give the sauce a velvety finish. Use an immersion blender for a few seconds if you want a silkier emulsion, but after blending always pass the sauce through the chinois again for absolute smoothness.
6️⃣ Balance and seasoning tips
• Taste for balance. If the sauce tastes too acidic, add a small pinch of sugar or a teaspoon of honey. If it is too bitter from tannins, a splash of good stock or a touch of butter will soften the edge. Adjust salt and pepper at the end. If the sauce is too thin, continue reducing; if it is too thick, add a little hot stock.
🔹 Step 5 Serving
1️⃣ Resting and slicing the meat
• Let the meat rest at least ten to fifteen minutes, covered loosely so juices redistribute and do not run out when sliced. Slice against the grain in half inch to one centimetre thick slices for the best mouthfeel. If the roast was tied, remove the twine carefully before slicing.
2️⃣ Plate and sauce proportions
• Warm the plates before serving so the food stays hot longer. Place two to three slices per serving and spoon two to three tablespoons of the warm Barolo sauce over the meat. Reserve extra sauce in a gravy boat for guests who want more. A generous serving of sauce is essential because it complements the meat and helps carry the flavor across side dishes.
3️⃣ Garnish and final touches
• Finish with a light grating of orange zest for a fragrant lift or sprinkle a few finely chopped fresh parsley leaves for colour. For an authentic Piedmontese twist, serve with finely crushed amaretti on the side or as a garnish for a subtle texture contrast.
4️⃣ Make ahead and reheating
• Brasato often improves one day after cooking as flavours meld. For leftovers, reheat gently in a saucepan over low heat with a splash of stock or wine to prevent drying. Do not boil during reheating. Slice and warm in the sauce to preserve tenderness.
5️⃣ Troubleshooting common issues
• Sauce too bitter from wine reduction: add a teaspoon of honey or a small knob of butter and a splash of stock.
• Meat not tender after the scheduled time: continue cooking in the same covered pot and check every thirty minutes. Toughness usually means connective tissue needs more time to break down.
• Sauce too thin: reduce further or add a small beurre manié. Add slowly and whisk to avoid lumps.
Wine pairing: Barolo DOCG or a young Nebbiolo for a more approachable choice
Side dishes: creamy mashed potatoes, rustic polenta, or roasted winter vegetables
Dessert: finish with bunet, the classic Piedmontese chocolate and amaretti pudding
Extra aroma: add a hint of orange zest in the marinade for a subtle citrus lift
Storage
Allow leftovers to cool completely before storing.
Refrigerator: up to two days in an airtight container
Freezer: up to one month for the cooked beef, but avoid freezing the raw marinade
Reheating: warm gently over very low heat with a splash of broth or wine, never boil to preserve tenderness
The origins of Brasato al Barolo are intertwined with the nobility of nineteenth century Piedmont. The first written testimonies are linked to Cavalier Giuseppe Falletti, the last Marquis of Barolo, and his wife Giulia Colbert Falletti, a French philanthropist who elevated Barolo wine to aristocratic fame. According to legend, their chefs decided to immerse a large cut of beef into Barolo wine and aromatic spices, transforming a tough piece of meat into a noble dish.
The name brasato comes from the French braiser, which refers to slow cooking at low heat, often with embers placed both below and above the pot. Since the nineteenth century, Brasato al Barolo has become one of Piedmont’s culinary symbols, served at banquets, noble feasts, and celebrated today at food and wine festivals in the Langhe and Monferrato.

Braised By Lasagnolo9 – Own work, CC BY-SA 4.0
Share this recipe
Lorem ipsum dolor sit amet, consectetur adipiscing elit. Ut elit tellus, luctus nec ullamcorper mattis, pulvinar dapibus leo.